Tuesday, 23 December 2014

The Truth of Pine Floors


There’s a lot of opinions out there regarding different types of flooring and installation. We always recommend you understand all your options fully before making any final decisions. To help in your research, we’ve debunked some common Pine Flooring myths below:

Myth: Pine floors are not durable enough for high traffic areas.

Truth: Pine is a wonderful choice for the entire home, including high-traffic areas. There are different species of Pine that hold up better in certain conditions – for example, Eastern White Pine is one of the softer woods, though also one of the most beautiful, and has held up in entryways and living areas of homes since the 1700’s. Red Pine and Southern Yellow Pine floors offer a similar light patina and feel as the Eastern White, and are a bit harder, allowing for maximum abuse with little wear.

Myth: I can’t install a Pine floor over radiant heat.

Truth: Engineered Pine is the perfect solution to both rooms with radiant heat as well as basements. Available in various species, widths and grades, Engineered Pine is resistant to the temperature and moisture fluctuations of these atmospheres. Once installed, it is impossible to discern the Engineered Pine from a solid wood floor, allowing the beauty of Pine in any area of your home.

Myth: Plank Pine flooring will cup and split with changes in weather.

Truth: Plank Pine Flooring is manufactured and kiln dried specifically to withstand changes in humidity and temperature with little to no movement. Your installer will allow the floor to acclimate for 2-3 weeks in its environment before installation to ensure the floors are well adapted to their new home. Proper subfloor and installation will finalize the process, creating a beautiful new Pine floor to last for generations.


Sourced from: http://iheartpine.com


Art of Clean are specialists in: 


Working for domestic or commercial clients throughout Cambridgeshire, Essex, Suffolk and Hertfordshire.

For more information about our services please contact our friendly team on 01223 863632 or visit www.artofclean.co.uk.


Sanding and oiling wooden floor at Church Hall in Bar Hill Cambridgeshire

The Church hall in Bar Hill received a sanding and oiling last week, just in time to welcome worshippers for the most holy of Christian celebrations - Christmas.


It took some work, there were two coats of sealer used - firstly an oil-based sealer followed by a water-based sealer.  As we all know - oil and water don't mix and this meant that the layers had begun to flake (see first 2 images).


 Oil-based sealer followed by water-based sealer = flaking!
 You can see the patchy effect of the flaking
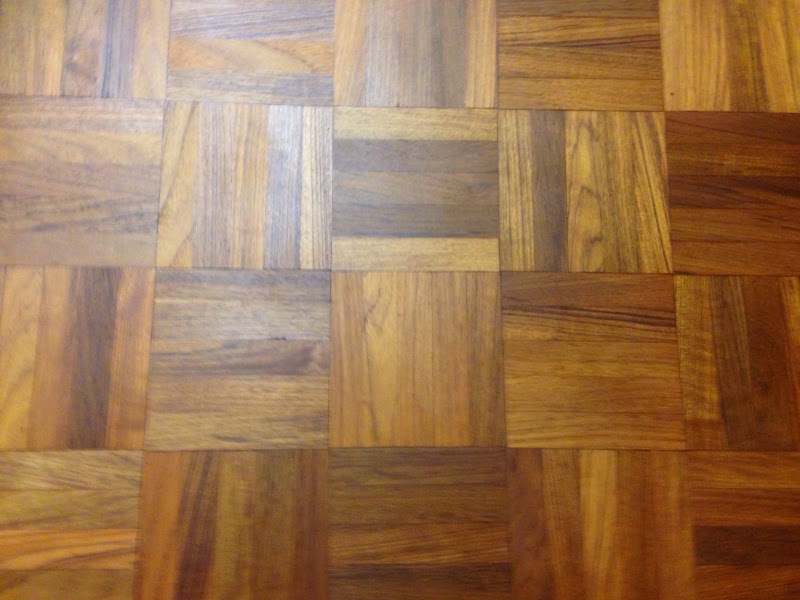
 After sanding the wooden floor back we were left with a beautiful 5 finger parquet floor to seal
 Using Pullmanns Magic Oil to seal and protect the floor, the woods natural beauty began to shine through
 Paul is using the blade oiling technique to distribute the oil.  This needs to be done quickly so that it doesn't have time to dry - else layering will occur which will give an uneven finish.
Nathan is buffing the floor to work in the oil and remove excess.


 The parquet floor looked stunning afterwards.  Unfortunately the pictures don't quite do it justice, however we know the congregation at Bar Hill Church will be very pleased with the superb results.

  No more flaky floor
 

Art of Clean are specialists in: 


Working for domestic or commercial clients throughout Cambridgeshire, Essex, Suffolk and Hertfordshire.

For more information about our services please contact our friendly team on 01223 863632 or visit www.artofclean.co.uk.


White Oil Maple floor boards taken back and re-oiled with natural finish oil

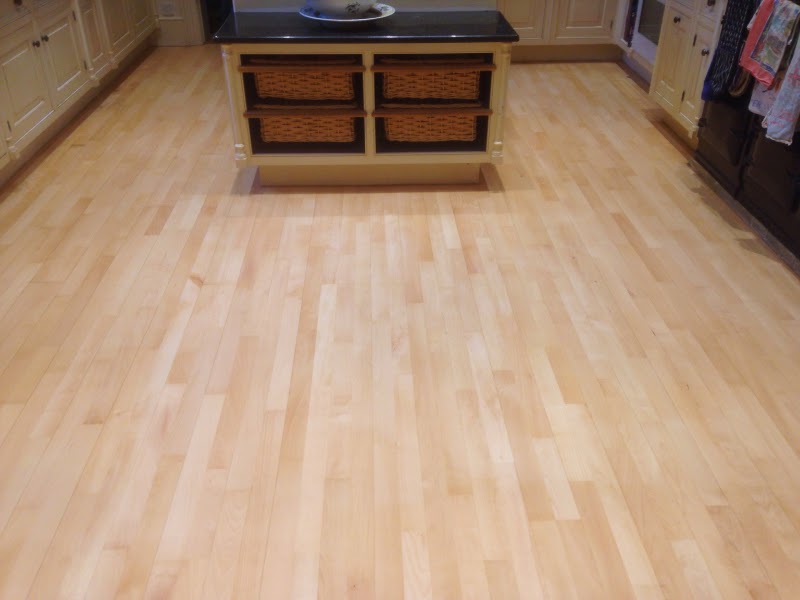
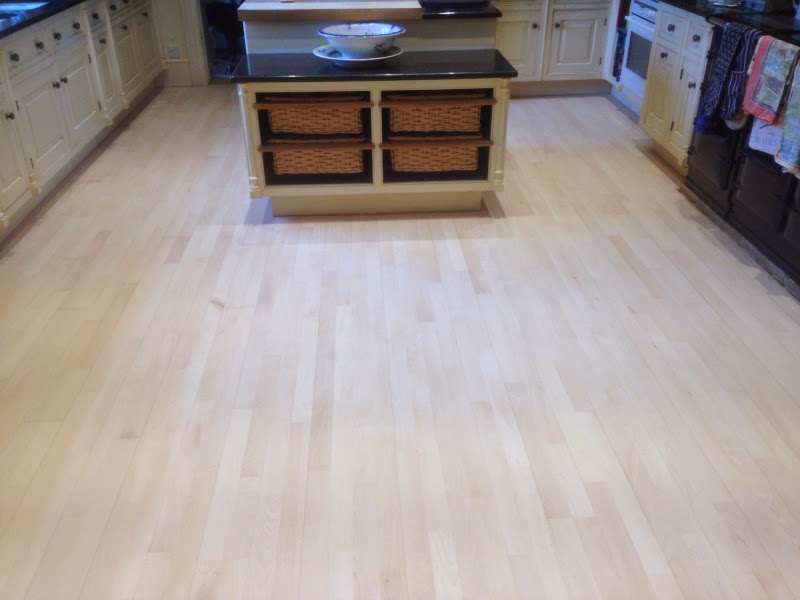
This kitchen has beautiful Maple floor boards, they were originally protected with White Oil to give the wood a lovely pale look.  The clients requested that we sand the floor and re-oil in a natural finish.

We used Pullmanns Magic Oil (available from our online store www.artofcleanonline.co.uk) which give translucent protection and simply enhances the woods natural colours.  The Maple floor boards had a beautiful soft, warm golden glow to them once we'd finished.


Art of Clean are specialists in: 


Working for domestic or commercial clients throughout Cambridgeshire, Essex, Suffolk and Hertfordshire.

For more information about our services please contact our friendly team on 01223 863632 or visit www.artofclean.co.uk.

Tuesday, 16 December 2014

What a find - Beautiful parquet floor found under carpet in newly purchaced home in Cambridge


 Too often when buying a period house you find the old floors have been removed or seriously damaged and an simply covered up with carpet.


But these lucky chaps were lucky enough to find exactly what you'd wish to find under the carpet.......


A beautiful, practically complete parquet wooden floor - running from room to room throughout much of the down stairs - simply beautiful


 There was some damage to some areas, mainly water damage, that required some blocks replacing


Water damage from radiator leak


And oddly there was a section of the floor removed that had been replaced with concrete, but this was taken out and replacement blocks were laid.

Repairs done, the parquet blocks were sanded flat to even them out.


A perfect colour match was achieved, and the finished floor looked stunning

 The floor was oiled with Pallmann Magic Oil to protect the wood and enhance the beautiful colour of the parquet floor.


Art of Clean are specialists in: 


Working for domestic or commercial clients throughout Cambridgeshire, Essex, Suffolk and Hertfordshire.

For more information about our services please contact our friendly team on 01223 863632 or visit www.artofclean.co.uk.


Monday, 15 December 2014

Testing out Bona products - Bona Mega & Bone Prime Deep


Sometimes our customers specify what products they would like up to use in their homes, and we are generally happy and able to assist.

Here I am trying out the Bona products that a customer would like us to use on their Pine Wood Floor.

Bona create hard wood floor cleaning and protection products that, to the best of their abilities, do not release unpleasant fumes during or after treatment.

"Bona Mega is a waterborne, residential and commercial hardwood floor finish. The proven performance and value standard in the industry, Bona Mega is an oxygen-crosslinking polyurethane (OCP) waterborne formula with extraordinary performance. The oxygen in the air is the crosslinker. No additives to mix, no limited pot life, and no wasted finish."

"Bona Prime Deep brings out that traditional deep colouration in wooden floors. The intense colouration in a low VOC formula is a truly unique combination only available from Bona."

Sourced from: http://www.bona.com


Art of Clean are specialists in: 


Working for domestic or commercial clients throughout Cambridgeshire, Essex, Suffolk and Hertfordshire.

For more information about our services please contact our friendly team on 01223 863632 or visit www.artofclean.co.uk.


How to sand and seal a wood floor

Step 1 – Sanding and preparation


Before you start sanding back to the bare timber, you need to remove or countersink any screw or nail heads that protrude. The sanding itself takes several stages, depending on the floor’s overall condition, and there are a few important things to take into consideration:

    1. Is the floor solid or engineered? If your floor has already been sanded in the past, can it take any more? You might need to remove a section of the door threshold or skirting board to find out.
    2. For drum or belt sanding, you need to decide which grit grade you need. This also depends on the condition of the floor as a whole. If it’s badly worn and uneven, you’ll probably have to start with a rough sandpaper followed by successively less rough papers. You can get sandpaper in grades 16, 24, 36, 40, 50, 60, 80, 100, 120 and 150, with 16 the most aggressive and 150 the finest.

Most sanding jobs start with around 36 or 40 grit sandpaper, working up to around 120 grit for the final sand. If you or your contractor aren’t using a dust free sanding machine, remember to remove all the dust with a vacuum cleaner between every sandpaper grade change. If possible, save some of the fine sanding dust for later, you’ll need the finest stuff later on, if your floor needs filling.

Start in the middle of the room and work your way to the edges. Guide the sanding machine carefully around the floor at a middle-range speed, keeping the speed constant and remembering not to leave the machine on one part of the floor for too long, which can lead to difficult-to-even-out gouges.

What about the grain? It’s always best to sand with the grain rather than against it, which can leave you with a slightly furry finish because you’re disturbing the grain instead of going with the flow. If it isn’t possible to follow the grain because of the way the pattern is laid, there’s a way to overcome it:

  • For complex herringbone pattern floors, sand in the same direction as the light source.
  • For Parquet flooring, sand at a 45 degree angle to the pattern.

Once the central area of the floor has been sanded, it’s time to tackle the edges. This is where edge sanding comes in, removing old finish from the room’s perimeter where the belt or drum sanding machine won’t reach. Kick off with a 36 or 40 grit paper then work your way up to the finest.

It’s best to work in gentle, slow circular movements, working your way steadily through the grits from heavy to light. If you miss out grit levels you could end up with a strange-looking halo effect, which shows up even more when you apply the wood finish.

Merv, our resident sanding expert says “When sanding herringbone or Parquet flooring, it’s always important to sand in the direction of one set of the blocks, usually 45 degrees to the room. Be sure to apply the lacquer in the same direction, this will help prevent demarcation lines (sanding marks) in the final finish.”

Step 2  – Mixing and filling


You should have plenty of fine sanding dust left over from your efforts, created by the 80-100 grit sandpaper. It’s exactly the right colour to match the floor so mix it with a clear wood filler gel such as Bona mix and fill or Fiddes Wood Filler Gel and use it to fill any small holes or gaps between the planks or parquet tiles, anything up to 6mm. If you have bigger gaps, fill them with a one or two pack wood filler instead.
Step 3 – Buffing to a high sheen

You need to carry out a series of final sands to smooth your repairs and make the surface finish-friendly. Use a circular motion and bring 100 grit into play, followed by finer 120 or 150 grit grades. Remove all the dust in between every stage, otherwise residue from the rougher papers can catch under the sander and leave nasty scratches.

Step 4 – Applying wood finishes to floors

Staining

  • Products like Morrells Light Fast Solvent Wood Stains are great for delivering beautiful wood grain definition and an excellent overall colour. Because they’re spirit based and dry pretty fast, it’s best to only apply them to a small area at a time to avoid patches. Take it easy and you should be fine.
  • Apply your stain with a brush, rag or special mohair pad. Get rid of any excess with a clean, dry cloth to help the final lacquer finish stick properly.
  • Never use an exterior wood stain designed for decking, fencing or garden furniture, since they contain water repellents which also repel water based floor lacquers.

Sealing

  • Always choose a water based floor finish that includes a primer/sealer, designed to enhance the wood’s natural colour and reduce the risk of ‘side bonding’, where the planks or parquet tiles get stuck together. If the wood shrinks – which it often does because of atmospheric conditions, central heating and seasonal temperature changes – the lacquer film gluing the wood together cracks, which looks awful.
  • Apply your sealer with a t-bar applicator or a short pile mohair roller. Apply the sealer thinly and evenly and don’t put pressure on the roller. Be gentle, applying no pressure, and let the roller do the job it’s designed for.
  • When the sealer is completely dry, which usually takes anywhere between two and four hours, you can apply your first layer of water-based topcoat. You don’t need to do any more sanding.

Lacquering

Did you know that varnish and lacquer are the same thing? The trade tend to refer to varnishes as laquers while the public more commonly refer to these products as varnishes.

  • Again, use a t-bar applicator or a short haired microfibre roller to spread the product evenly over the floor. Remember not to use any downward pressure, instead letting the roller do its job. If you press down you can form annoying pools of superfluous lacquer.
  • Leave 2-3 hours to dry completely, after which you should sand the lacquer with a rotary sanding machine (often called a de-nib) and a 150/180 mesh screen.
  • Clean off all the dust and debris and you’re ready to apply the top coat.

Top coat

  • Do you use a single pack varnish such as Manns Floor Varnish or a 2 pack lacquer system such as Manns 2 pack Lacquer? And do you choose a matt, semi-mat, satin or gloss finish? As a rule your lounge, bedroom and so on are best given a coat of something like Manns water based Floor Varnish or Bona Mega while hallways, bathrooms, kitchens and other heavier wear areas will benefit from Manns 2 Pack water based varnish or Bona Traffic HD. That said an additional coat of 1 pack lacquer is also a common way to finish high wear, residential areas.

A typical domestic application in 7 steps


    1.Apply one coat of sealer or primer onto the pre-sanded surface

    2.Let it dry for 2-3 hours

    3.Apply one coat of floor varnish by microfibre roller or floor finish applicator

    4.Let it dry for 4-6 hours

    5.Rotary sand the surface with 150/180  grit paper and remove the dust (de-nib)

    6.Add a second coat of water based floor lacquer, again using a roller

    7.If you want a deeper, fuller finish, you can apply a third top coat of varnish.

Oiled floors


Instead of sitting on the surface of the wood, oils sink in for a warmer, more natural look. Here’s how to achieve it.

  • Sand through the grit levels until you reach 120, which leaves the wood’s pores open enough to accept an oil finish
  • Apply a thin coat of oil using a mohair roller, floor applicator pad, lint free cloth or special solvent-safe squeegee
  • Leave it to dry for 4 to 8 hours depending on the product being used
  • Lightly sand or de-nibb the floor with a scotch pad or fine grit paper
  • Vacuum to remove all traces of sanding dust created when de-nibbing
  • Apply a second thin coat of oil
  • Wait 12 hours for everything to dry and settle
  • If required, buff your floor to improve the sheen

Sourced from: http://www.wood-finishes-direct.com


Art of Clean are specialists in: 


Working for domestic or commercial clients throughout Cambridgeshire, Essex, Suffolk and Hertfordshire.

For more information about our services please contact our friendly team on 01223 863632 or visit www.artofclean.co.uk.


What to do when sanding floors that follow through to other rooms


Sanding wooden floors is a time-consuming and disruptive job, so considerations need to be made when planning the work to ensure you don't add unnecessary work and hassle to your schedule.


If you are sanding a floor, such as the hallway, that receives high foot traffic and will need attention much sooner than adjoining rooms, a challenge can arise when there are no floor bars to divide the space.


At this point you have two options:


1. If all of the adjoining rooms have wood floors that have some degree of wear that need to be addresses immediately or in the near future then it will be best to have them all sanded at the same time.  This will eliminate the issue of having to disrupt the house on multiple occasions.  Also, and very importantly, having all the floors sanded at the same time will mean there will be consistency across the board, so each room will seamlessly merge into one another.

2. if you have rooms where the wood floor is in a great condition and does not need sanding, though it is connected to a busy hallway, then you may want to consider fitting a very nice high end brass strip to the floor following the sanding – (always after the sanding so no accidental scratch marks are created) This way you visually break the rooms up  so you do not need to sand all the floors

Here is a link to a place that sell a very good brass door strip - http://www.jimsengineering.com/index.php?option=com_content&view=article&id=36%3Abrass-door-strips&catid=2%3Achandlery&Itemid=2


Art of Clean are specialists in: 


Working for domestic or commercial clients throughout Cambridgeshire, Essex, Suffolk and Hertfordshire.

For more information about our services please contact our friendly team on 01223 863632 or visit www.artofclean.co.uk.


Wednesday, 10 December 2014

How to maintain your newly sanded floors? How to make sure you don't damage your wood floor with water!

You have just had your wood floor sanded and it looks as good as new. Now how do you keep this lovely wood floor clean and looking as it does now?
Let’s face it – It will get dirty! Your cleaning regime is the only weapon you have.


Here are a few tips on keeping your wood floor clean:

Regular dry soil removal:
The big enemy of wood floors and the finish on them is dry soil and grit wearing the finish off the floor. To keep your floor free from dry soil you can use a good quality soft broom or you can use a vacuum cleaner with a special soft floor attachment.

Your furniture is yet another consideration. We strongly recommend Felt pad protectors under all your furniture. These are not just ordinary pads – They come with replacement pads that can easily be clipped out to be renewed. They also screw in thus last much longer and are much safer for your floor.

1-    MAINTENANCE ROUTINE
It is crucial your weekly cleaning of your wood floor is done correctly.

You will wood oil care Kit:

-    A 2 compartment mob bucket
-    Good quality mop (clean)
-    Cleaning solution –We recommend Pallmann Clean  (available in 0.75 litre or 10 litre)
-    Clean water

Fill one side of your mop bucket (the side you will wring your mop in) with clean water.

Make your cleaning solution mix as described on the bottle in the other mop bucket compartment.
The pump dispense on the 10 Litre Pallmann Cleaner dispense about 15 Ml per squirt. This is enough cleaner for 1 to 1.5 litres of cleaning water. One smaller containers manual measuring will be required. Consumption for 0.75 Liter: approx..100-200ml/10 liters of water.

Wet your mop in the clean water and wring it out. Dip the tips – (3 – 6 inches) into the cleaning solution and wring your mop. Now start mopping your floor. After cleaning about 3 – 5 sq meters rinse the mop in the clean water side of the bucket and dip the tips of the mop (3 – 6 inches) into the cleaning solution side – wring out and repeat as above.

Let the floor dry and return to normal use. If it is a large area replace the rinse water when dirty. You will get into a rhythm to get the ratio of cleaning water and rinse solution just right so when the rinse water is dirty your cleaning solution will be finished in the bucket.

Why do we advise the above method?
Simple – if you mop a floor with a single compartment mop bucket you will collect the dirt on the floor and contaminate your cleaning solution with this. You will then keep spreading this onto the floor every time you rinse your mop in the solution

PLEASE NOTE – DO NOT PLACE METAL FURNITURE IN DIRECT CONTACT WITH YOUR WOOD FLOOR AS THIS CAN CAUSE MARKS – FLOOR PROTECTORS AS DESCRIBED AS ABOVE IS STRONGLY ADVISED

2-    FINISH CARE STOP(available in 0.75 Litre ) – LACQUERED FLOORS ONLY
Apply in very thin layer – Undiluted

Over time the floor will tone down after use. To give the floor a fresh lift it is best to apply a coating of Finish Care Stop  to the floor after a clean (ad described above) Use the T bar applicator and apply a very thin layer of Finish care Stop evenly to the floor(Very thin even coat. This should be done when the floor appears a bit dry and dull every 3 – 6 months depending on use. DO NOT OVER APPLY as it can cause a build-up.


For product orders, visit www.artofcleanonline.co.uk and use discount code CG2013 to receive 10% off your first product order!
For more information call Art of Clean on 01223 863 632

Testing out Bona products - Bona Mega & Bone Prime Deep


Sometimes our customers specify what products they would like up to use in their homes, and we are generally happy and able to assist.

Here I am trying out the Bona products that a customer would like us to use on their Pine Wood Floor.

Bona create hard wood floor cleaning and protection products that, to the best of their abilities, do not release unpleasant fumes during or after treatment.

"Bona Mega is a waterborne, residential and commercial hardwood floor finish. The proven performance and value standard in the industry, Bona Mega is an oxygen-crosslinking polyurethane (OCP) waterborne formula with extraordinary performance. The oxygen in the air is the crosslinker. No additives to mix, no limited pot life, and no wasted finish."

"Bona Prime Deep brings out that traditional deep colouration in wooden floors. The intense colouration in a low VOC formula is a truly unique combination only available from Bona."

Sourced from: http://www.bona.com


Art of Clean are specialists in: 


Working for domestic or commercial clients throughout Cambridgeshire, Essex, Suffolk and Hertfordshire.

For more information about our services please contact our friendly team on 01223 863632 or visit www.artofclean.co.uk.


How to sand and seal a wood floor

Step 1 – Sanding and preparation


Before you start sanding back to the bare timber, you need to remove or countersink any screw or nail heads that protrude. The sanding itself takes several stages, depending on the floor’s overall condition, and there are a few important things to take into consideration:

    1. Is the floor solid or engineered? If your floor has already been sanded in the past, can it take any more? You might need to remove a section of the door threshold or skirting board to find out.
    2. For drum or belt sanding, you need to decide which grit grade you need. This also depends on the condition of the floor as a whole. If it’s badly worn and uneven, you’ll probably have to start with a rough sandpaper followed by successively less rough papers. You can get sandpaper in grades 16, 24, 36, 40, 50, 60, 80, 100, 120 and 150, with 16 the most aggressive and 150 the finest.

Most sanding jobs start with around 36 or 40 grit sandpaper, working up to around 120 grit for the final sand. If you or your contractor aren’t using a dust free sanding machine, remember to remove all the dust with a vacuum cleaner between every sandpaper grade change. If possible, save some of the fine sanding dust for later, you’ll need the finest stuff later on, if your floor needs filling.

Start in the middle of the room and work your way to the edges. Guide the sanding machine carefully around the floor at a middle-range speed, keeping the speed constant and remembering not to leave the machine on one part of the floor for too long, which can lead to difficult-to-even-out gouges.

What about the grain? It’s always best to sand with the grain rather than against it, which can leave you with a slightly furry finish because you’re disturbing the grain instead of going with the flow. If it isn’t possible to follow the grain because of the way the pattern is laid, there’s a way to overcome it:

  • For complex herringbone pattern floors, sand in the same direction as the light source.
  • For Parquet flooring, sand at a 45 degree angle to the pattern.

Once the central area of the floor has been sanded, it’s time to tackle the edges. This is where edge sanding comes in, removing old finish from the room’s perimeter where the belt or drum sanding machine won’t reach. Kick off with a 36 or 40 grit paper then work your way up to the finest.

It’s best to work in gentle, slow circular movements, working your way steadily through the grits from heavy to light. If you miss out grit levels you could end up with a strange-looking halo effect, which shows up even more when you apply the wood finish.

Merv, our resident sanding expert says “When sanding herringbone or Parquet flooring, it’s always important to sand in the direction of one set of the blocks, usually 45 degrees to the room. Be sure to apply the lacquer in the same direction, this will help prevent demarcation lines (sanding marks) in the final finish.”

Step 2  – Mixing and filling


You should have plenty of fine sanding dust left over from your efforts, created by the 80-100 grit sandpaper. It’s exactly the right colour to match the floor so mix it with a clear wood filler gel such as Bona mix and fill or Fiddes Wood Filler Gel and use it to fill any small holes or gaps between the planks or parquet tiles, anything up to 6mm. If you have bigger gaps, fill them with a one or two pack wood filler instead.
Step 3 – Buffing to a high sheen

You need to carry out a series of final sands to smooth your repairs and make the surface finish-friendly. Use a circular motion and bring 100 grit into play, followed by finer 120 or 150 grit grades. Remove all the dust in between every stage, otherwise residue from the rougher papers can catch under the sander and leave nasty scratches.

Step 4 – Applying wood finishes to floors

Staining

  • Products like Morrells Light Fast Solvent Wood Stains are great for delivering beautiful wood grain definition and an excellent overall colour. Because they’re spirit based and dry pretty fast, it’s best to only apply them to a small area at a time to avoid patches. Take it easy and you should be fine.
  • Apply your stain with a brush, rag or special mohair pad. Get rid of any excess with a clean, dry cloth to help the final lacquer finish stick properly.
  • Never use an exterior wood stain designed for decking, fencing or garden furniture, since they contain water repellents which also repel water based floor lacquers.

Sealing

  • Always choose a water based floor finish that includes a primer/sealer, designed to enhance the wood’s natural colour and reduce the risk of ‘side bonding’, where the planks or parquet tiles get stuck together. If the wood shrinks – which it often does because of atmospheric conditions, central heating and seasonal temperature changes – the lacquer film gluing the wood together cracks, which looks awful.
  • Apply your sealer with a t-bar applicator or a short pile mohair roller. Apply the sealer thinly and evenly and don’t put pressure on the roller. Be gentle, applying no pressure, and let the roller do the job it’s designed for.
  • When the sealer is completely dry, which usually takes anywhere between two and four hours, you can apply your first layer of water-based topcoat. You don’t need to do any more sanding.

Lacquering

Did you know that varnish and lacquer are the same thing? The trade tend to refer to varnishes as laquers while the public more commonly refer to these products as varnishes.

  • Again, use a t-bar applicator or a short haired microfibre roller to spread the product evenly over the floor. Remember not to use any downward pressure, instead letting the roller do its job. If you press down you can form annoying pools of superfluous lacquer.
  • Leave 2-3 hours to dry completely, after which you should sand the lacquer with a rotary sanding machine (often called a de-nib) and a 150/180 mesh screen.
  • Clean off all the dust and debris and you’re ready to apply the top coat.

Top coat

  • Do you use a single pack varnish such as Manns Floor Varnish or a 2 pack lacquer system such as Manns 2 pack Lacquer? And do you choose a matt, semi-mat, satin or gloss finish? As a rule your lounge, bedroom and so on are best given a coat of something like Manns water based Floor Varnish or Bona Mega while hallways, bathrooms, kitchens and other heavier wear areas will benefit from Manns 2 Pack water based varnish or Bona Traffic HD. That said an additional coat of 1 pack lacquer is also a common way to finish high wear, residential areas.

A typical domestic application in 7 steps


    1.Apply one coat of sealer or primer onto the pre-sanded surface

    2.Let it dry for 2-3 hours

    3.Apply one coat of floor varnish by microfibre roller or floor finish applicator

    4.Let it dry for 4-6 hours

    5.Rotary sand the surface with 150/180  grit paper and remove the dust (de-nib)

    6.Add a second coat of water based floor lacquer, again using a roller

    7.If you want a deeper, fuller finish, you can apply a third top coat of varnish.

Oiled floors


Instead of sitting on the surface of the wood, oils sink in for a warmer, more natural look. Here’s how to achieve it.

  • Sand through the grit levels until you reach 120, which leaves the wood’s pores open enough to accept an oil finish
  • Apply a thin coat of oil using a mohair roller, floor applicator pad, lint free cloth or special solvent-safe squeegee
  • Leave it to dry for 4 to 8 hours depending on the product being used
  • Lightly sand or de-nibb the floor with a scotch pad or fine grit paper
  • Vacuum to remove all traces of sanding dust created when de-nibbing
  • Apply a second thin coat of oil
  • Wait 12 hours for everything to dry and settle
  • If required, buff your floor to improve the sheen

Sourced from: http://www.wood-finishes-direct.com


Art of Clean are specialists in: 


Working for domestic or commercial clients throughout Cambridgeshire, Essex, Suffolk and Hertfordshire.

For more information about our services please contact our friendly team on 01223 863632 or visit www.artofclean.co.uk.


Hard wood floor repair and restore in Cambridge UK


With changing trends many people are going back to choosing hardwood floors over carpet in their

homes. There are many benefits, they're easier to clean, more resistant to spills, don't harbor allergenic material....and most of all they look stylish!

We recently completed work on a floor that needed total restoration.  It was found, hidden under old carpet and and paint in quite a state.  This required a lot of work but the results were very satisfying.  And if you have ever tried to do this yourself you will understand what I mean a by a LOT of work.
They wanted the entire floor sanded and oiled to give it a rustic look.


Firstly we had to remove all the paint and sanded the boards right back to remove all the build up of dirt, grime and previous seals revealing the wood in all its glory. Some areas were so damaged they needed replacement.


 Here you can see Pierre finishing the boards with a hand sander.


And here you can see the transformation after the sanding and repair work is completed.


Following this Paul applied the oil to protect the boards.


For further information on our floor sanding service we provide please contact us on 01223 863632 or visit www.artofclean.co.uk.

Here's a great video that compares the advantages of oiling wood floors to lacquering:


Ultimate floor sanding and Art of Clean

Terry from Ultimate floor sanding wit Pierre de Wet. We are the affiliate.

Which one is the best finish on wooden floor? hard wax oil or lacquer?

This is quite a common question our customers ask us at Art of Clean, professional floor cleaners in Cambridge. This really depends on the type of finish you would like to achieve. At Art of Clean we would normally discuss these options with you on our initial inspection of your wooden floor.

Hard wax oils contain a mixture of oil and wax, which completely saturates into your timber flooring. Which means that no other liquid can be absorbed into your wooden floors, so if you were to spill any drinks, accidently tip up your bucket of cleaning water onto the surface then none of this would go into your lovely wooden floor.
The wax element of the hard wax oil, protects the surface from small scratches to the wood. Hard wax oil finishes are generally popular with our customer’s wooden floor cleaning requirements in and around Cambridge, as they are the easiest to maintain. The hard wax oil also comes in various shades and colours, and offers three different types of sheen finishes.

Lacquers on the other hand act in a slightly different way, rather than absorbing into the wooden surface of your floor, it will sit on the surface.
The type of lacquers we use at Art of Clean in Cambridge, have flexible qualities, so rather than drying into a solid rigid surface, the lacquer will flex with the timber when it is scratched or dented. This type of finish is harder to maintain, as although it is durable, if you need to touch up and scratches, it’s much harder. There are also only a two different types of finishes available too.


We realise at Art of Clean that it all comes down to a question of taste, and as hard wood flooring cleaning experts we will be happy to help you choose the most suitable finish for your hardwood floor, so why not give us a call on 01223 863632.

Tuesday, 2 December 2014

Maple floor sanded in Quendon, Saffron Walden ~ finished with a white oil


We have just finished sanding and oiling a maple floor in Quendon (Saffron Walden) this week.

The maple floor was sanded and then we applied the white oil. (Pallman White Oil)

It looks beautiful!


If you would like some more information about our professional rug cleaning services please contact our friendly team on 01223 863632 or visit www.artofclean.co.uk.

We are a professional cleaning company who specialise in Carpet CleaningRug CleaningHardwood Floor Cleaning, Stone floor CleaningUpholstery Cleaning and Leather Furniture Cleaning for domestic and commercial clients through out Cambridgeshire, Essex, Suffolk and Hertfordshire.

About Maple wood flooring

We recently sanded and oiled a lovely kitchen floor in Quendon, Saffron Walden (see images here).  The floor was made of Canadian Maple which you don't see too often however it has become quite a popular floor in more modern high-end refurbishments.  It's chic look, subtle tones and cool light reflective qualities are a stark contrast to the more traditional golden rustic hues of Oak and Pine, and the deep auburn tones of Mahogany.

www.decobizz.com
There are 13 types of Maple grown in Canada and North America.  Hard Maple and Black Maple are very durable woods that rates highly on the Wood Hardness Scale, ranking above Oak,  making making them a great choice for both domestic and commercial flooring.  However, other species of Maple such as the Silver or Red Maple are classed as softwood and would not work well in a busy walkway as the wood would damage more easily.  Do be sure to check with your supplier what species of Maple they supply so you can make the best decision for your property.

The close uniform grain of Maple gives it it's beautiful soft & smooth finish that is so desirable.  Unfortunately, however, it is also also this quality that makes scratches and marks more noticeable.  Laquering a Maple floor would only highlight scratches even further, a matte oiled finish would be most suitable to keep maintenance costs down.


If you would like some more information about our floor maintenance services please contact our friendly team on 01223 863632 or visit www.artofclean.co.uk.

We are a professional cleaning company who specialise in Hardwood Floor Cleaning, Stone floor Cleaning,   Carpet CleaningRug Cleaning, Upholstery Cleaning and Leather Furniture Cleaning for domestic and commercial clients through out Cambridgeshire, Essex, Suffolk and Hertfordshire.